Home

Showing posts with label decor. Show all posts

Wednesday, October 3, 2012

Is it Fall yet?


It is hard to believe it is Fall already! With temps in the hundreds the past few days, it is more like a summer heat wave around here. But it is Fall and Halloween is just around the corner.

Halloween is one of my favorite holidays, especially for decorating.
Halloween is spooky, silly and scary all at once.

This year to start off my decorating I went to a fun Halloween only craft faire.

Halloween and Vine

This is a juried show and all the crafters/artists displayed amazing Halloween art. Some silly, some fun and some downright spooky.  If I had a bigger pocketbook, I could have bought a lot more. It was so hard to decide what I could afford and not live with out.

This silly little witch below had to come home with me. She is so ugly she is cute!


The artist I bought her from is Kerry Howard Schmidt.
Paper Moon
Lots of fun, felted goodies!


This little kitty came home with me too. I will be hanging it on my Halloween tree. But first I will need to make a fake candle, as my tree is in our sun room, and candles don't do well out there. It can get a bit toasty out there on a hot day!


Len Bentham created this little kitty and "Jack"
Happy Holidays Blog


This artist had some amazing Halloween figures, I wish I could have spent more money!!!


It was really hard to decide what to buy, but I think these too will fit right in my Halloween decor.
As I get it all set up I will share some of my crafts and some of the Halloween decor I already own, some I have had for years.

Thanks for visiting!
Posted by Picasa

Saturday, March 31, 2012

Easter Crafting


While browsing Pinterest I found a lovely burlap wreath that said it was the easiest burlap wreath to make. All it required was a roll of burlap and a 14 in wire wreath frame. And the decorations of your choice. I found what I needed at Michael's. I already had the eggs and found a nest at Beverly's.
It was very easy to create, just pull loops of burlap through the sections of the wire wreath frame, evenly spacing the loops and pulling and twisting the loops to get the look I wanted. 
I wired the nest to the wreath and just tucked sprigs of the blossoms in between the loops. 
Since nothing is glued to the burlap I can change the wreath decor with the seasons. 

You can find a photo pictorial at the link below.

My next Easter craft project were these little baskets or treat cups made from fancy cupcake papers. The ones I used came from the Martha Stewart line at Michael's.


I made these first two at a fundraising crop I went to hosted by my friend Heather
to raise money for her son's baseball league. It was a great crop and I would have made more that day, but I ran out of double stick tape!!

So this week I made a few more!


Below is the pile of supplies I used to make the baskets. The most important supply is a messy scrap table. Because no matter how often I pick up after myself I get crafty and make another mess!


This the tape I used. It comes in several different brands and widths. I used the 
1/8th inch size for my baskets.

Step one: cut about 1 inch off a standard piece of pipe cleaner or chenille stick. 
Cut a 1 inch wide piece of crepe paper twice the length of the pipe cleaner. 

 Using needle and thread make a running stitch down the middle of the crepe paper. Fold down the ends twice to make a sturdier support for the thread. 
When you have stitched the length of the paper, slowly gather the crepe paper until it is about an inch shorter at each end than the pipe cleaner. 


Place a strip of the super tacky tape along the center of the gathered strip of crepe paper, 
over the thread. Set aside. 


Using my Martha Stewart multi blade scissors I cut fringe into a strip of green crepe paper. 


I cut two strips of crepe paper to fit twice around the inside of the cup. I used more 
super tacky tape on the inside of the cake cup. 

I adhered the crepe paper around the inside and repeated this step to make a double row of fringe. 


The next step was to adhere the handle to the inside of the cup with more sticky tape. 


I used a paper punch to make a decorative paper strip from cardstock. This one has a hole pattern that I could weave ribbon through. 

Using a large needle I wove some seam binding ribbon through the holes. Paper is fragile, 
so I did this very carefully. I left about 5 inches of ribbon at both ends of the paper strip to tie a bow. 


More super sticky tape to adhere this strip to the basket between the paper cup and grass fringe. I centered the strip with center front of the basket.


I tied a bow with the ends of the ribbon. 


Next I added a flower to the basket handle and added a punched butterfly as an accent. I line of glitter glue (Stickles) down the center of the butterfly for a body. 

I used a layered paper flower with a brad here, but I also used a die cut flower and a 
vintage millinery flower on others. 


Add some Easter grass, Easter eggs, or better yet, chocolate eggs and you are all done!!


Filled with some chocolate or other goodies it will make a sweet Easter treat, 
or with pretty eggs, a bit of Easter decor. 

Sunday, March 18, 2012

Easter Sneak Peek


The Easter Bunny had a little accident at our house today 
and made a mess in our yard. 
I wonder what he will bring on Easter???


Today I put all my Easter decorations out around the house and will decorate my Easter tree tomorrow evening. I am a little late in getting my Easter decorations up this year. 

My free time has been drastically reduced! 

I started a new job last week and it includes some "mandatory" overtime. I knew that going in, so I was expecting it. Overtime will be great for my crafty "spending budget", but bad for my crafty "spending time" :) I am hoping I can find a balance I can live with and still have a relatively clean house! 

I am glad to have this job, but while I was looking for my work, I did have a lot of free time and sure enjoyed the chance to relax and craft when ever I wanted. 

I hope to take some pictures of my Easter decor and post them soon. Plus, I went to Michael's today and bought some supplies to make a couple of new Easter crafty decor items that I will post as soon as I complete them. 


Wednesday, February 8, 2012

A Before.......

Today I am posting a couple of "before's"......to keep me on track to get them finished!! 

I have a couple of painting projects that I need to get done, and I figured if I posted them here, I might actually complete them in a timely manner!


First is a quick one to complete. I use this shelf my son built in high school wood shop for towels in my bathroom. I have two fabric boxes that sit on the top and bottom shelves that I bought at Ikea, that fit perfectly. But they were getting worn and soiled, and as they have card board stabilizers sewn inside, I could not wash them. Last time I went to Ikea, I bought some new boxes, but in a new print, cream & black toile. So I decided this shelf needs a new paint job also, so I will be painting it black. 


My next project is this table. It is my old dining room table I now use in my solarium. It has been through years of wear and tear with three boys. And keeping it in the solarium, where it can get up to 160 degrees on a hot day if the windows are not opened has also been hard on the finish. I will be painting it a creamy white and distressing the edges, as it will get that way soon around my house!
Ignore the painted floor that is really showing its age, another project to tackle! 

Both have been scrubbed with TSP cleaning solution, a bit of sanding and next the paint. 

Check back, for the finished looks! 

Tuesday, January 3, 2012

Winter Wishes

Now that the Christmas season is over, even though my Christmas tree is still up,
I have taken down most of my holiday decorations.

One of the holiday decorations I have for every holiday or season is my Holiday Collage. I have a 12x12 scrapbook shadow box frame that I bought at Michael's.
Each new holiday or season gets a collage.

I wanted to take down my Christmas collage but was not ready to put up my Valentines collage, so I made this "Winter" collage. A snow and New Years theme. I got the idea for a holiday collage from my friend Jenny. She has a frame she changes out each holiday and when she made hers, she inspired a bunch of her crafty friends to make holiday collages of their own.


I went through my stash of crafty/scrappy supplies and put together a big pile of stuff to work with. All   the papers have a blue/teal color range. Lots of glitter papers too.

I used a clip art of a 1907 New Years card and a little card board ornament of a cherub that I have had in my stash for over 25 years for my "New Years" part of the collage.

The Bingo card is from October Afternoon and the little snowmen are left
overs from my snow globe project.
The white deer is from Martha Stewart, I covered it in glitter.
The glitter trees, bird and house are cut from Sizzix dies.
The felt snowflakes are from Stampin' Up. I layered the snowflakes and added rhinestone/pearl brads from Michael's in the centers.
"Snow" is cut from my Cricut and "Day" are Making Memories letter stickers.
The "winter wonderland" cut out is from My Minds Eye.
The little cameo is from Websters pages and the silver star is an ornament from Target.


Because my scrapbook frame is also a shadow box I could use some very dimensional elements like my snowmen on the Bingo card. I just had to trim a little from the backs so they would lay flat. 

Lots of glitter glue, pearls and glitter added sparkle to the collage.
Below the collage in the frame. 


I have made a collage for every season and will share them all as I change out the frame.

Now to put away all the stuff I pulled out to make the collage :)

Thanks for looking!
Posted by Picasa

Tuesday, December 27, 2011

Mini Snow Worlds

I had a very nice Christmas day, but now that Christmas is over, I am sad the season 
will soon come to an end. 
But my sister Lou will be visiting this week through New Years, so Christmas and the holidays will last a bit longer here at our house. 

Christmas morning just before the gift unwrapping frenzy begins!

I have one more holiday project to share before the season is over. I made a large temporary snow scene under a cloche that I had been wanting to put together for the holiday. 


Snow white bottle brush trees, two glass glittered deer in a snow dusted setting. 

I had fun making this scene, so I wanted to make some more. I found a couple of glass pieces at an antique store and made a couple of mini snow scenes. 


These two were the part of a shrimp cocktail set, the larger, the base for the ice and 
the smaller piece, holds the shrimp. 

The little snowmen were made from Model Magic from Crayola. An easy to work with clay that dries quickly. The little hats were also made from the Model Magic. The carrot noses are painted toothpicks. The little crown a scrap of gold paper. I painted the snowmen and added eyes and blushing cheeks with paint. Each completed snow person got a dusting of fine crystal glitter from Martha Stewart. 
I made little houses from glitter card stock. An assortment of bottle brush trees complete the scenes. Each scene rests on a circle of glitter card stock. 

I put each scene together by first hot gluing the snow people, houses, trees and embellishments to the glitter card stock circle. I turned my "jar or dome" upside down and put in about 2 spoonfuls of creamy white glitter. This I have had for several years and have not been able to find more. 
I wish I could find it again as it worked so well.

Then I ran a small bit of clear glue, 3D crystal effects by Sakura around the rim. I placed the glittered circle upside down over the rim and carefully flipped the whole dome right side up. I made sure the dome was centered over the circle, while holding the rim to the glitter card stock base. 

I then ran a line of hot glue around the edge, between the glass rim and glitter circle and placed some tinsel trim along the hot glue line. On top of each dome, I glued a button, bauble or knob to each. When all was set, I gave the whole thing a good shake to settle the snow. All complete! 
I had so much fun I wanted to make more and was lucky to find more of the shrimp cocktail cups and small glass bowls at my local thrift store for a great price!


Two mini globes.


Two little penguins and their igloo. 

Two Giants fan snow people with their orange glittered house for my sister and her hubby, 
big SF Giants fans!

A little family of three for my friend Jenny whose little angel Isabel 
was born just a few weeks ago. 


The whole little snow globe family. I have a few more to put together, one each for my sons. I have lots of little snow figures made as once you open the package of Model Magic, it is hard to seal, and it can dry out, so I made snow figures until the clay was gone. 

This was a very fun project and I enjoyed making each little scene. 

These will stay out through January, as they are too much fun to pack away! 

Happy Holidays to all and wishing everyone a happy and prosperous New Year.

Berta


Thursday, November 17, 2011

From Free to Fabulous

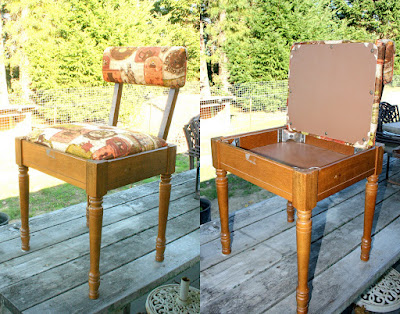
Back in September during my visit to my sisters place in Oregon I went to several thrift, vintage and antique stores. While I was buying another cabinet which will be refinished in the future, the store owner asked if I wanted this sewing chair. 
Since it was such a great deal, I said yes. It was FREE!


It had a good finish, just some old tape residue and old '60's "style". And a really ugly and dingy print fabric on the seat and back. But it has handy storage in the seat!

Since the chair was free I figured I could experiment with the new 
Annie Sloan Chalk Paint paint I wanted to try. 
I removed the seat and back and cleaned the wood. No sanding or stripping required. I applied two coats of Old White chalk paint. After it dried, I added the first coat of wax. After the wax dried I sanded the finish to smooth it out and distress the edges to give it an aged look. Another coat of wax and buffing and the chair was ready for some new cushions. 
I stripped the old fabric and foam from the seat and back. After I added some new high density foam to the seat board and covered the foam with the new fabric. The fabric was another bargain from my favorite thrift store, The Legacy
I secured the fabric at the center top with my staple gun, then moved to the center bottom and secured that. Then to each side. And then each corner.

Then I stapled all around the edge and trimmed the excess fabric. 

I did the same with each front and back piece. I reassembled the chair and all done! 


I will use the chair in my scrap/craft room when I sew. I don't know what I will store in the seat. I have plenty of sewing and craft supplies so I know I can find something to stash in there. 

A close up of the finish. I distressed the edges of the chair to look old and vintage, just not 1960's old

Thanks for visiting!