Home

Showing posts with label fabric. Show all posts

Thursday, November 17, 2011

From Free to Fabulous

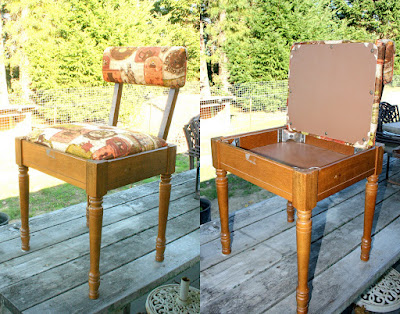
Back in September during my visit to my sisters place in Oregon I went to several thrift, vintage and antique stores. While I was buying another cabinet which will be refinished in the future, the store owner asked if I wanted this sewing chair. 
Since it was such a great deal, I said yes. It was FREE!


It had a good finish, just some old tape residue and old '60's "style". And a really ugly and dingy print fabric on the seat and back. But it has handy storage in the seat!

Since the chair was free I figured I could experiment with the new 
Annie Sloan Chalk Paint paint I wanted to try. 
I removed the seat and back and cleaned the wood. No sanding or stripping required. I applied two coats of Old White chalk paint. After it dried, I added the first coat of wax. After the wax dried I sanded the finish to smooth it out and distress the edges to give it an aged look. Another coat of wax and buffing and the chair was ready for some new cushions. 
I stripped the old fabric and foam from the seat and back. After I added some new high density foam to the seat board and covered the foam with the new fabric. The fabric was another bargain from my favorite thrift store, The Legacy
I secured the fabric at the center top with my staple gun, then moved to the center bottom and secured that. Then to each side. And then each corner.

Then I stapled all around the edge and trimmed the excess fabric. 

I did the same with each front and back piece. I reassembled the chair and all done! 


I will use the chair in my scrap/craft room when I sew. I don't know what I will store in the seat. I have plenty of sewing and craft supplies so I know I can find something to stash in there. 

A close up of the finish. I distressed the edges of the chair to look old and vintage, just not 1960's old

Thanks for visiting! 


Thursday, November 3, 2011

Fabric Flowers

 I have been sewing since I was a young girl. I have always had a love for fabric. I have never been much of a quilter, but totes, bags, toys, clothes, pillows and things for my home have run under the feet of my sewing machine. 
Collecting fabric has been something I have always done too. My collection started when my older sister Lou would send me fabric scraps and remnants from her sewing projects. 
Oh the fun things I could create from all those pretty fabrics! 

Fabric collectors are just like scrappers who love their pretty paper! And I love to collect that too! 
And now you can buy the same pretty prints in fabric and paper! Both Moda brand or Stampin' Up sell fabric that coordinates with scrapbook/card making papers!

So I can also use those pretty fabrics in my scrapping and card making too. 

Below are three cards where I have used fabric to make the flower embellishments and a fourth where I have used a standard sewing staple, a zipper, for a flower too!  


The easiest flower to make is the fabric YoYo. 


Cut a circle of fabric about twice the size of the finished yoyo. Find a circle twice the size you need and trace it on the back side of your fabric. Fold over about 1/8th to 1/4 of an inch along the edge. Hand sew with a knotted, doubled thread along the fold with a running stitch. Keep folding and stitching until you go all around the circle. Pull up the thread until tight and you have a small gathered circle in the middle. Make a    couple of small stitches to secure your circle. Trim your thread and you are done! Simple!

For the twisted fabric flower, you need to start with a circle of heavy duty tacky tape. A quick way to cut a circle is to use your die cutter. A link is here for Glubers, pre-made adhesive circles. There is a tutorial on the site to make these flowers. I did not follow this tutorial so check it out. I had lots of adhesive sheets, so I made my own.


Once you have your adhesive circle peel off one side of the backing and place the circle on a scrap of any used sticker backing paper. I used the empty sheet of Avery address labels. Set this aside.

Next tear a 1" strip of fabric. For a 2" flower you will need a strip of fabric 1" by 23". Tear along the crosswise grain of the fabric. "Fat quarters" (18"x23") are an easy source to buy for fabrics. 

Pinch the end of the fabric strip and center it on the circle of adhesive. Twist the fabric strip around on itself several times and slowly adhere the twisted strip to the adhesive in a spiral working from the center out until you fill up the circle. If you have extra at the end, trim off all but about 1 inch. Fold back the backing and tuck the fabric tail under the circle. 
Then you are ready to attach it to your card or scrapbook page. 

 The next flower is made from zipper. You can buy zipper ribbon now, but there is no shop in my area that sells it. I went to my local fabric and craft thrift store, The Legacy. They sell new and used zippers any size from 10 to 35 cents. And I showed up on 50% off day, so I paid 5 to 17 cents each!!

I separated my 22" zipper and used just one half, so I can make two flowers for 17 cents! 
Start with another doubled, knotted thread and needle. Fold under the end and start a running stitch. After about 3-4 inches, pull up the thread to slightly gather the zipper. Tack the circle together from the back side. 


From the back side fold and pinch and tack the zipper edge around the circle until you reach the end of the zipper. Tack a few stitches at the end of the zipper to the back of the flower to secure. 

Place a circle of heavy duty adhesive on the back of the zipper circle and you are done! The zipper coils are often painted to match the fabric, so you can spiral the zipper with the color side up or down. 


All papers used on the cards are from Stampin' Up. 

Thanks for checking out my blog, any questions?? Leave a comment. I love to hear from you!
Friday, October 21, 2011

Where does the time go??

When I lost my job in mid September, I thought "wow, I will be able to get so many things done, have so much time to craft" Ha! I seem busier than ever and not much time to craft!

Between traveling for fun and for work I have been home all of 4 days in the past three weeks. 

My house is a mess, I have not been able to craft much, except for the weekend getaway in my last post! 

I had gone to visit my sister Lou in Oregon, for a week.

I came home Sunday for 3 days and then left for my scrapping retreat on Thursday until Sunday. 
Came home from that on Sunday morning.

Emptied my suit case and filled it back up to leave early Monday to fly to Boulder.


I flew home the following Saturday and finally crashed on Sunday.

On Monday I cleaned a bit, painted my old green bookcase that I moved out to make way for my new red cabinet I bought at Ikea to house my scrapbook albums.

I painted it black to go in my scrap room to replace my old wire cubes.
And since my scrap room is a mess, this is all you will see of it for now.

Tuesday was spent cleaning as I had not been home much lately and prepared for some overnight company. My nephew in Bakersfield had come to San Francisco on Amtrak and would be riding his bike from SF to my house that afternoon. A 60 mile ride on back country roads and some scary city riding. He is braver than me! Since he was visiting I invited my next door cousins over for dinner.
A great evening with family!

On Wed I got up at 5:00 am to leave for the city (SF) for a job search program. The third trip to the city for this program. The first trip I only made it halfway as traffic on 101 was a mess! The second trip, I made it with two minutes to spare! This time there was no traffic so I had an hour wait at Starbucks. It was only 4 hours long so that left me time to walk to Union Square and have lunch with my sister Sally. She works at Britex Fabrics so I also had a chance to shop. Mostly window shop as fabric at $50 a yard and up is not fabric you buy just because it is pretty!

Thursday I had more company, as my 3 Stampin' Up friends and I got together to craft and share ideas. Since it was my turn to host, I made up two sample projects for all of us to craft.

A fun way to spend the afternoon! After it was time to go to my son's football game.

Today was a day to relax. I finished up my ATC swap that I am participating in and will mail them off to my fellow ATC swappers. Artist Trading Cards have been around awhile, but this is my first time to join a swap. I have been in other swaps (circle journals, cards and charm swaps). I am looking forward to seeing all the great artwork I will receive!
And now more football tonight. Tomorrow I hope to do nothing! Or at least just what I want to do :)

Sunday I will be heading to Tomales for their annual Flea Market. I hope to find a treasure or two! 

Tuesday, August 23, 2011

An end and a new beginning....

The last two months at work have been crazy busy! And I have not had much crafting time, and I am getting grumpy about that! But there is a light at the end of my tunnel. On Sept 9th, I will no longer be employed. My company is consolidating and the area where I work is being transferred to other sites. And since I won't and can't relocate to San Jose or Boulder or New Hampshire, I am out of a job.

Though the thought of being unemployed is scary, I do have a good severance pkg. and unemployment,
so my family and I will get by for awhile.

But it will be strange not to get up and go to work everyday. I have worked almost 14 years at my present job and almost 19 at the job before. And almost 5 the job before that. I only had 4 days off between the last two jobs. I have never had time off that I did not know the day I would be returning to work.

Many people ask what me will I do?? My answer? I don't know? I hope to take a little time off and just play and craft and do what ever I want.
Then look to see what can I do? What do I want to do? And can I make it work?

I know I will not get bored. There are too many projects floating around in my head. It will seem luxurious
 to be able to craft, scrap, play with paper or fabric or paint any time I want.

I did get to play with a little fabric and paper this week.
My friend Jenny had a birthday on the 17th. I wanted to make her something and decided a scrap tote would be fun and handy. I found a beautiful aqua blue fabric and this fun dot pattern and sewed a tote that will hold a 12x12 plastic scrapping bin, plus a little more.

It has an extra long handle to slip over your shoulder. Usually if you are going to a crop, your hands are full with all your other scrap totes, so I thought a shoulder bag would be the handiest!

I also added an easy snap closure across the top to hold the contents in the bag. And a big flower just for the cuteness factor!

And no handmade gift is complete wtih out a hand made card.

Now that I am finished with Jenny's gift and it is delivered, I am ready to finish my previous sewing project I started before lots of overtime at work got in the way! A sneak peek is below.

I do not know what the future holds. It is a little bit scary, a little bit sad, as I will miss many of my co-workers. But also a little bit exciting. Something new is around the corner for me. What it is, I don't know.

I am thinking positive that it will be good!!

Thanks for visiting my blog!
Posted by Picasa

Monday, August 8, 2011

Some Bling and a Goodbye...


Sunday was a sad day as I saw my long time hair stylist for the last time. She will be moving to Tennessee next month and will no longer to be able to cut and style my hair and keep those greys away!
 She has been cutting my hair since before her daughter was born and her daughter graduated from college this June! Almost 22 years!She has been more than just a stylist, but also a friend.
Jennifer, I wish you and Bruce well in Tennessee! And I sure hope we can visit sometime too!
I made this card and took her flowers. I wanted to take her a gift, but not one she would have to pack!


I have been working so much lately that I have not had much time to scrap or craft. I cannot wait until Sept 9th!! I was able to squeeze in a scrappy afternoon with my friend Heather on Saturday after work. It was so nice to sit and scrap and visit with Heather at her house for an afternoon.

A while back I posted this red suitcase I found at the Petaluma Antique Faire. I wanted to turn it into a jewelry crafting case.

I have been working on it off and on the past few months or so and finally finished it about a month ago. But then I wanted to try it out and do some beading and jewelry making. A few evenings this last week I hauled the case out to my living room and made some jewelry to try out the case. So far it is working out great!
I took out the mirror and fashioned a tool holder to fit inside the lid. Below are the basic steps I took to make my tool holder to go where the mirror was before. I used foam core as my base and some vintage fabric
and elastic.

I wanted the holder to be secure inside the lid so I used two kinds of adhesive. Really tacky tape and a silicone adhesive liquid. And I was careful as I placed the holder in the case to not glue any of the cute red ruffle behind the tool holder. And really strong carpet thread to keep the fabric taught on the foamcore.


And the outside needed a little glam also, so glued some braid around the case and finished the ends with some sparkly vintage red & silver buttons. Again I used more really tacky tape and fabric fusion glue. If one glue is good, two must be better!
All done and filled with my basic supplies. Just add some bead cases with my project beads and I am good to go, to bead and craft anywhere.

And I did!
I made two pairs of earrings and a little pink nest for my friend who is having a baby! She has not gotten it yet, so I guess this spoils the surprise ;-)

I also made this vintage necklace, using a resin flower from my scrapping supplies and anything else that struck my fancy.

If you have any questions about the card, case or jewelry, just post a comment and I will get back to you!

As always, thanks for visiting!

Posted by Picasa

Thursday, April 28, 2011

I got a new toy today, don't be Jealous!

I got a new toy today. I was shopping at JoAnn Fabrics and all their sewing notions were half off! So I could not resist picking up a few necessities and of course a few "wants" too!
One of my wants has been a new one of these. And if JoAnn Fabrics says it is a sewing notion,
I won't argue.


Now don't be jealous I bought a new ironing board! I know, an ironing board is not the stuff of every woman's dreams, but if you sew a lot, it is a wonderful tool. My new one also has an iron holder at the end, very handy, as I am notorious at bumping my board and sending the iron flying. And you don't want to "catch" a hot iron!! (Don't ask how I know this).
The ironing board will be a nice addition to my two other trusty sewing companions, my sewing machine and serger. I have had my Husqvarna (Viking) machine for over 25 years and still sews perfectly. And to think Husqvarna also makes chain saws? And yes, we have many of their saws around our ranch.
My little Husky Lock makes beautiful finished seams.

I am planning several new sewing projects so a new board will make the sewing go much smoother.

I made these curtains for my bedroom in March. I love toile prints and am happy with my new curtains.
But my old chair is looking shabby with its mis-matched hand me down stripes from two other rooms.
So the machine and ironing board will get put to good use making a new matched set.
I also have my red case I found at the antique faire that will become my beading case. It needs a new inside lid to hold my beading tools that I am planning to make. I have not decided if I will use the vintage fabric I found or raid my fabric stash or buy new.
I have several other sewing plans in the "planning in my head" stage. A new pincushion, a new purse, a new tote, new living room curtains? The list goes on. If only the time would go on and on too!