Home

Showing posts with label holiday trees. Show all posts

Sunday, July 8, 2012

4th of July Craftiness

I added a few new ornaments to my 4th of July tree this year. I made these three little barrel ornaments from empty ribbon spools. I store most of my ribbon on old fashioned clothes pins so when I buy a new ribbon spool I take it off the spool and transfer it to the clothes pin. What to do with the empty spool besides toss it?

Why make an ornament of course!


Below are the basic steps to make an ornament. First remove the ribbon. Then carefully take off the round chipboard sides so you just have the "spool" left. I added some music paper to this spool with a decoupage medium.

When that dried I used my crop-a-dile to punch a hole in the spool and threaded a hanging loop through the hole with bakery twine.

The next step was to find a die about a half inch larger in diameter than the spool. One of my scalloped Spellbinders "nesties" worked perfectly! Solid colored card stock or paper with two sides works best as you will see both sides.

I centered the first scalloped circle on the table, centered the spool on top and glued the inside edges. Then I added glue to the top of the spool and centered the other circle on the spool. If your pattern paper has a definite up or down design, be sure to line up the pattern with the hanging loop.
Next step was to weight the spool until the glue dries. I used a several items sitting on my table to weight the spool. A plastic jar bigger than the spool and floral frog.


When the glue is dry, it is time for the fun part! Since these were for my 4th of July tree I used my stash of patriotic papers and embellies to decorate both sides. Crepe paper ruffles, glass glitter, glitter paper, Stickles, punches and dies. On several of the ornaments I also added some paper border trim around the spool. 


I had some bits and pieces left over and put together this tiny garland ornament. Each pennant is only about an inch tall! 

Thanks for looking! As always, any questions post a comment! 
Posted by Picasa

Thursday, July 5, 2012

Happy 5th of July


 Happy 5th of July! 

I have not been here for over 2 months!!!! Life has just gotten in the way of my crafting and blogging. 
 I decided to re-arrange my craft room, move my sewing stuff to another room. It has taken me a lot longer than planned and still I am not finished. But I will save that for another post!

I did get my 4th of July tree up! I made a few new ornaments and also fixed one that did not survive the heat and sunlight of the solarium. I made a loopy chain garland from chenille stems in red, white and blue to circle the tree. I also made some little barrel ornaments I will share in another post. 


The ornament on the left started out with some patriotic crepe paper that disintegrated but the collage stayed intact. I added it to a vintage red Christmas light reflector. All shiny & new. 

I also finally scrapped my photos from my Newspaper article post about my 4th of July tree. 
I bought the photos from the Press Democrat and scrapped them on the lay out below. In my album I will have the layout on one side and the newspaper in a page protector next to it.


I used lots of red, white and blue of course! 

Thanks for looking!


Friday, January 27, 2012

Love is in the Air

Love is in the air and red hearts are appearing all over my house.
It is not yet February, but my Valentines are up on display, to spread some love around my home.

Like my last collage I posted Winter wishes, I also made one a few years ago for Valentines Day.
It goes in the same frame that changes out with the seasons and holidays.


The collage is full of Valentine motifs surrounding a big glitter heart and swirl. A heat embossed chipboard key to my heart, a rhinestone centered velvet flower and some vintage Valentine images. Easter and spring will go up next. 

I made the collage below using my Cricut and most of the images came from the Zoo Balloo cartridge. I did not realize the cart had this cute house and tree on an animal themed cartridge. The papers are mostly Basic Grey and the rub on title is from Jenni Bowlin.


Below is my Valentine banner. Five chipboard hearts covered with pattern paper, crepe paper ruffled circles and LOVE in sparkly red glitter. 

I have some vintage and reproduction Valentines I like to display in my photo holder. 


A big pile of punched hearts sewn together makes a sweet garland. 

I had a few friends come over to play with paper and stamps on Thursday and I made these little matchbox Valentine treats for them. The boxes are cut from a die from Stampin' Up and the label and bird are Stampin' Up punches. A sweet treat!

Our projects we worked on Thursday were this sweet card that can be a Valentine, wedding or just because card. All supplies are from Stampin' Up. The basket below was our other project. 

The little basket is one I made from inspiration I found on this blog, thelittleblueroom, via Pinterest. 
I changed the handle and style a bit and added the two little tags, both are crafted with 
stamps and punches also from Stampin' Up. 
A little red and white bakers' twine from Martha Stewart ties it all together. 


My Valentine tree is all decorated for the holiday. Christmas and angels have come down and red hearts and love have gone up. 


Many of the ornaments are ones I have made just for the tree. 
This paper covered chip board heart with a felt rose is a new one for this year. 
  

These four below are some I made the first year I put up a Valentine tree in Jan. 2010. In 2009 I had gone on a vacation right after Christmas and by the time I was taking down my tree in my solarium, it was mid January. So I decided I might as well leave it up a few more weeks and turn it into a Valentine tree. My family liked the tree and thought I should decorate a tree for every holiday. And now I do! 

Each year I create a few more ornaments for the tree. Vintage images, glitter and tinsel come together to make some love filled decorations. 


Most of my Valentine decor is up on display, but if I find some new inspiration, there will be more! I love to craft for the holidays and every year I bring out my decorations I am reminded of the fun I had crafting them all.

As always, if you have a question about the supplies or techniques I used, please leave a comment. I would love to hear from you! 
Posted by Picasa

Tuesday, December 13, 2011

Vintage Holiday

My house is almost decorated for the holidays. The village is set up, the Santas and snowmen are displayed. I have a small forest of mini trees decked out in the living room as well.
All five of the big trees are up and decorated.
Each of my sons have their own tree, so I only have to decorate 2 trees.
I get help with the main big tree as it is usually 11 feet tall. Since we grow them here on the ranch cost does not matter, so we can go as big as will fit. And with so many trees I need  a lot of ornaments to fill to fill them out. And since I love to craft, crafting special ornaments for the trees is even better.

The little deer ornament below was made from a music paper pin wheel. The ends of the pleated paper were cut on a diagonal to make points at each fold. I added a crepe paper rosette, then layered a circle of super sticky sheet on top of that. I cut the little image of the deer from patterned paper about a 1/4 inch smaller than the adhesive circle. I centered the paper circle in the middle and and sprinkled glass glitter on the remaining exposed adhesive. Added a little vintage poinsettia and all done.


The next ornament started with 4 inch wide sheets of music paper strips I scalloped edged with my jumbo scallop scissors. One of the best Dollar Store items I have ever bought! I scored the paper at each "scallop" and connect 3 strips to make a circle.
On top of that I placed a vintage Christmas light reflector I scored at my fav thrift shop, The Legacy. A big gallon sized bag stuffed with odds & ends of reflectors for .25 cents! About 30 or more reflector pieces. On top of that I placed a scallop circle of glitter paper and a circle with a Santa image.

My next ornament uses one of my favorite vintage images from clearly vintage. I started out with 3 inch squares of music paper rolled into a cone and adhered. I then adhered all of the cones to a 3 inch circle of chipboard. I started at the top, bottom and side points, 12 o'clock, 3 o'clock, 6 o'clock
and 9 o'clock. I adhered the points with glue. Then filled in the circle with more cones. I made sure all the cone "points" faced the same direction in the circle.
After they were dry I placed several thick foam squares in the middle of the circle and placed another chipboard circle edged with glass glitter in the middle of the paper cones. You only need to put glitter on the outside 1/2 in. edge of this circle.
Then a circle punched from my vintage image printed on matte photo paper on top the glittered circle. A few silver leaves and a vintage pink rose finish the ornament. I re-enforced the punched circle for the hanger with more music paper on the back.

Here is the same image adhered to a glittered chipboard snowflake. A few flowers and rhinestones and you are done. Super simple!

The Santa star here looks very simple, but when you turn the ornament around as in the second photo, you see a three dimensional star.

The shape is formed from a flat 5 pointed star. 


Cut a star from chipboard and score as shown in the black lines below. Fold each point tip to center in a mountain fold and each section where the points meet to center in a valley fold. Fold each score line and do the same with a piece of music paper. Layer and adhere these together. Cover a large square of chipboard with pattern paper and place the folded star right side up on the chipboard square (pattern paper side down). Make sure all the folds are even and adhere the edges of the raised star to the chipboard square with liquid glue. Hold in place with your hands until set.
When glue is completely dry, trim away the excess chipboard square. Edge the star with glue and add glass glitter. A sticker is added to the front and back. Poke a hole at the top and add a hanger. 

The last ornament is made from another light reflector. This a silver star with a red metallic flower in the center. I added a silver glittered scalloped circle over the flower and placed a chipboard image in the center of that. 


I punched holes at the top and bottom of the star and strung beads and two old vintage glass Christmas garland beads on to silver pipe cleaners. 

Thanks for looking and if you have any ???'s, let me know.


Posted by Picasa

Monday, October 31, 2011

Happy Halloween

Happy Halloween! 
May your Halloween be spooky, scary, fun and full of Halloween delights! 

This photo of "Jacks" is from last year. We have pumpkins to carve this year, but with no water yesterday and today, due to pump issues, we did not yet carve our pumpkins. 

Below is the carving crew!

This is the Pumpkin diorama I made last year. My friend Jenny and I saw one on display here and could not take the class so we made our own versions. 
 
I cut a "fake" pumpkin in half and decorated the inside and out with a spooky Halloween display.
I printed a black and white clip art of a tree silhouette and glued it to the back of the pumpkin. I mounted a flying glittery witch in front of the tree. My photo is one I found in an antique store. It appears to be a photo of an adult Halloween party and all are in costume. The back of the photo dates it as 1929. I cut out the group of Halloween revelers and added some color with pens.
In front I added moss and some pumpkins and a skull. I gathered a orange and black crepe paper ruffle and glued it to the opening. I added some sequined trim and a Halloween greeting.

Some of my yearly Halloween decor is shown below. My hutch decked out for the season. The two ceramic Jack-o-lanterns came from Pier One, way back in 1978. (I never throw anything away!). After Halloween I turn them around and they stay out as pumpkins until Thanksgiving.
My plate rack gets a little decoration and the cabinet below hosts my paper mache figures and my urn decked out in white pumpkins, purple flowers and a lonely black bird.

I just made the urn decoration this year. Super simple! A black plastic flower urn from OSH, two white   fake pumpkins from Michael's, a black bird and fall flowers. Just add foam to the urn base, top with straw or filler. Pop off the stem of the bigger pumpkin (but don't toss it, you can save it for another craft project?). Place the big pumpkin on the straw, top with the second smaller pumpkin. Place a black bird on top. (His wires will stick right into the fake foam pumpkin). Add a few fall flowers and you are done! I did not use glue as this will sit in a safe place and leaves me the opportunity to change it out next year?
My paper mache collection is made of two I bought, the cat and small pumpkin headed ghost. The large squash man and ghost topped jack-o-lantern box I made. I wanted to make another paper mache figure this year, but didn't get around to it!

And finally, my Halloween tree! This is the second year of my holiday trees and I added several new ornaments and the witch hat topper this year you can see Here.
Just a couple of detail shots below.
I hope everyone has a fun and safe Halloween. I sure miss having trick-or-treaters come by our house! Way out here in the country, no one stops by! But I always have candy, just in case :) 


Posted by Picasa

Thursday, September 29, 2011

Halloween Ornaments


This past week while I was visiting my sis in Oregon, I took some time out in the evenings and on Saturday to craft some more decorations for my Halloween tree. 
One of my favorites was this simple music paper rosette with a glittery witch glued to the front. 


The rosette is about 6 in. in diameter. I trimmed my 3.5" strips of music paper with my jumbo scallop scissors (a $ store find, the best buck I ever spent at Dollar Tree) and pleated the paper at every scallop. The silver glitter circle was cut from glitter paper with my new pennant die from Stampin' Up. The glittery witch came from MS crafts at Halloween last year. Why didn't I buy TWO packages?


My ghost is an old Making Memories chipboard shape I have had for years. The "paper" is real birch bark I found on the ground at my sis's house, from birch logs she got when someone cut down their beautiful birch trees! More black sparkly glitter paper is glued on the back for his eyes and mouth.

My little "boo" owl is punched from Stampin" Up punch and he sits on an orange paper rosette made from a new Tim Holtz Sizzix die. It makes two sizes and makes making "rosettes" a snap! The black circle is from my new package of sewing pins. Too cool to toss, so it was saved and re purposed into this fun ornament. I even added a MM Halloween pin. 

 The new tree topper for my Halloween tree this year will be this paper mache hat form I covered with old book paper and stained with a "black wash". 
I made some roses from black crepe paper to trim the hat, along with my glitter polka dot ribbon from Michael"s. To get the ribbon to lie flat to the brim, I pulled the top ribbon wire until it gathered to fit the hat brim. A little black bird and a big bow top it off!

My last ornaments are from a design I saw at Vintageimagecraft and is a free download and tutorial. 
They are too cute.  
I need to find an online source for the "bumpy" chenille as I can only find it locally at JoAnn's and you have to buy a pack with 10 different colors. And since you need 2 stems per color, you need to buy 2 packages. Good thing I plan to make some Santa's at Christmas to use the red and green. 

I hope to put up my "Halloween Tree" tomorrow and add all the new ornaments I made and decorate the rest of my house. Why did the weather have to hit the upper 90's this week? It does not feel like fall! May be my fall decorations will cool us off? 

Friday, July 1, 2011

7 1/2 minutes of Fame ;-)

Today I was featured in an online article in our local paper, the PressDemocrat. article.
Since the article only ran in the online edition, I did not see it in "print". So instead of 15 minutes of fame, I will settle for 7 1/2!

ETA: I made the "real" paper in the Saturday Home section! So I guess my 7 1/2 minutes of fame can really be 15 minutes! ;-)
Fourth fervor 

The paper ran a request for 4th of July celebrations and traditions and I submitted my 4th of July tree and was interviewed and photographed for the story.

I blogged about my tree here

It was fun to share about my tree and how the tradition got started. Since I love to decorate for every holiday when I started my holiday trees I already had lots of decorations for each season/holiday.
And each year it is fun to craft new decorations for the trees.
For the 4th of July tree I have made decorations to honor the service men in my family. One for my father-in-law Ray, who served in WWII. Another for my brother-in-law John who served in the Navy in the 50's and one for my hubby who served in Vietnam. They add a meaningful touch to my fun holiday tree!

Friday, June 17, 2011

Red, white and blue

I love to craft and a good excuse to make more crafts are to make holiday decorations.

After Christmas 2009, my sister and my niece and I went on a girls road trip from my home in Sonoma Cty. to Portland OR. We headed up Hwy 101 and had a great time stopping to shop, enjoy the sights, eat and stay where ever we thought was a good place to spend the night, spending New Years Eve in Portland. 

Since I did not return home until after New Years I still had all my Christmas decorations to put away.
I put up a big tree in my dining room that we cut down here on the ranch, so it had to come down first.
All 11 ft of tree and ornaments. And then all the other decorations, the Santas, the wall hangings, the garlands etc. So by the time I got to taking down my "fake" tree in the solarium, it was halfway through January. And now it was time to put out my Valentine decorations.
 So since the tree was still up, I turned it into a Valentine tree. I thought my sons and hubby would think I was crazy, but they liked it and even suggested I could do a tree for every holiday. So I did! I now have decorations for Valentine, Easter, Spring, 4th of July, Halloween and Thanksgiving! And I have crafted ornaments for all the trees.

Since 4th of July is the next holiday coming up, I now have my 4th of July tree on display. 


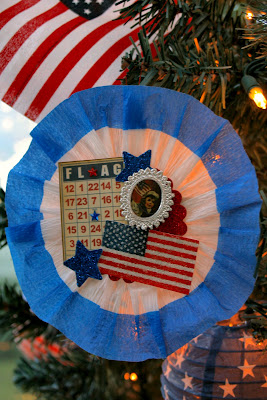
I made several paper crafted ornaments for the tree including this patriotic bingo card with a great vintage image from vintageimagecraft 
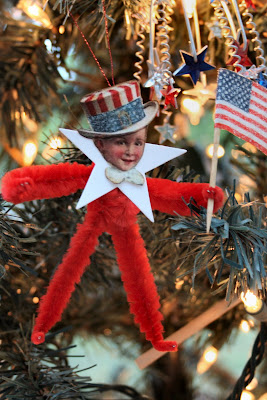
This little chenille man was made from a down load from Vintage Image Craft also.
He is so cute!

And another fun vintage image on a paper rosette.
The rosettes are easy to make with my Martha Stewart Crafts score board.
 Score board  A great deal at $20 and even better on sale or with a coupon. I use mine a lot!

I also found this great striped crepe paper streamer somewhere (I don't remember where) and made this ornament collage.

And my Jenni Bowlin vintage looking supplies also came in handy for this calendar card ornament.


The Liberty card ornament was put together with stuff from my stash.
I love decorating for the holidays and I will post my holiday trees with each season. So Halloween will be next, unless I decide to make a "summer/beach/tropical"  tree?
I am making a few more Patriotic ornaments and a garland for this year which I will post in a few days.


Thanks for looking! And if you have a ??'s about any of the products I used, let me know!
Posted by Picasa