Home

Wednesday, October 3, 2012

Is it Fall yet?


It is hard to believe it is Fall already! With temps in the hundreds the past few days, it is more like a summer heat wave around here. But it is Fall and Halloween is just around the corner.

Halloween is one of my favorite holidays, especially for decorating.
Halloween is spooky, silly and scary all at once.

This year to start off my decorating I went to a fun Halloween only craft faire.

Halloween and Vine

This is a juried show and all the crafters/artists displayed amazing Halloween art. Some silly, some fun and some downright spooky.  If I had a bigger pocketbook, I could have bought a lot more. It was so hard to decide what I could afford and not live with out.

This silly little witch below had to come home with me. She is so ugly she is cute!


The artist I bought her from is Kerry Howard Schmidt.
Paper Moon
Lots of fun, felted goodies!


This little kitty came home with me too. I will be hanging it on my Halloween tree. But first I will need to make a fake candle, as my tree is in our sun room, and candles don't do well out there. It can get a bit toasty out there on a hot day!


Len Bentham created this little kitty and "Jack"
Happy Holidays Blog


This artist had some amazing Halloween figures, I wish I could have spent more money!!!


It was really hard to decide what to buy, but I think these too will fit right in my Halloween decor.
As I get it all set up I will share some of my crafts and some of the Halloween decor I already own, some I have had for years.

Thanks for visiting!
Posted by Picasa

Saturday, September 8, 2012

Birthday Cards

I have several birthdays in August so I had to make some cards. One was a quick card using left overs and the other took a bit longer, but both were fun to make.

The first card also doubles as photo frame. I covered chipboard with this pretty pattern paper from MME. I covered both sides of the chipboard with paper so it looks good from front and back.

I used a Sizzix die to cut out the frame shape. I have two of the same Sizzix frame die, but in the second die I took out the frame "center" cutting blades so it would cut a full shape with out the "hole".

It's not hard to do, you just need a good pair of pliers!


I slipped a mat in front of the greeting, here the wood grain paper. To add a photo, just slip out the greeting and slip in the photo. I also used foam strips to raise the front of the frame for a shadow box look.
I made all the flowers using punches and flower stamens from the cake supply store. I colored the spiky white stamens with Copic markers to a  warm yellow shade.

The  card below was for my sis-in-law. She likes western themed things so these left over chipboard pieces from Cosmo Cricket made quick card embellishments. 

The sentiment is part of a set from Close to My Heart.

I hope the recipients of these cards liked them!

Thanks for visiting.
Posted by Picasa

Wednesday, August 22, 2012

Fair Time

Hello, long time no post! Life and work have gotten in the way of my crafting and scrapping! Hopefully my next post will be sooner. 

It was just county fair time here in Sonoma County. It is always a summer must for us to visit, to see the beautiful themed flower show, the animals, carnival and fair food!

I also love to check out the Adult Fine Art and Home Art Exhibits, and also the Kids exhibits. 
There are some talented people in our county. 

Almost every year I also enter items in the Home Art Exhibits. It is fun to see my creations on display and see if I won any ribbons! 

Below are a few of my entries this year. 

I entered my smashed penny bracelet, made from my smashed pennies I gather on my travels. I added some bead accents and used my handy Crop-a-dile from my scrap tools to punch a hole in each smashed penny. 

I also entered this little sewing book I made while scrapping at my friend Narda's one weekend. I covered manila file folders with sewing themed scrapbook paper and real sewing pattern tissue. I covered chipboard for the covers and put it all together with my bind-it-all.  
 
I embroidered the little heart for the cover. The photos that will go in the album are photos of my sewing projects that I have given away or were out grown! 


I also made another paper mache figure, this time a Santa with his toy bag on a paper mache book. Santa is molded from styrofoam shapes and aluminum foil, covered in paper mache medium.  

Painted and covered with mica flakes, all set for Christmas!

I entered some cards too! 
 
And of course some scrapbook pages!


My 4th Fervor page even won a blue ribbon!


I had another 2 page scrap book lay out, but the fair crew only displayed one page! I was disappointed they only displayed one side as they were attached together? The judge wrote on my entry, "where's the journaling?"  On the half of the lay out you did not see!

My son Henry entered a Lego creation, as he does every year. He always themes his creation to the Fair theme, and wins a blue ribbon every year he has entered.

Thanks for visiting! Hopefully my next blog post comes a little bit sooner that the last! 
Posted by Picasa

Sunday, July 8, 2012

4th of July Craftiness

I added a few new ornaments to my 4th of July tree this year. I made these three little barrel ornaments from empty ribbon spools. I store most of my ribbon on old fashioned clothes pins so when I buy a new ribbon spool I take it off the spool and transfer it to the clothes pin. What to do with the empty spool besides toss it?

Why make an ornament of course!


Below are the basic steps to make an ornament. First remove the ribbon. Then carefully take off the round chipboard sides so you just have the "spool" left. I added some music paper to this spool with a decoupage medium.

When that dried I used my crop-a-dile to punch a hole in the spool and threaded a hanging loop through the hole with bakery twine.

The next step was to find a die about a half inch larger in diameter than the spool. One of my scalloped Spellbinders "nesties" worked perfectly! Solid colored card stock or paper with two sides works best as you will see both sides.

I centered the first scalloped circle on the table, centered the spool on top and glued the inside edges. Then I added glue to the top of the spool and centered the other circle on the spool. If your pattern paper has a definite up or down design, be sure to line up the pattern with the hanging loop.
Next step was to weight the spool until the glue dries. I used a several items sitting on my table to weight the spool. A plastic jar bigger than the spool and floral frog.


When the glue is dry, it is time for the fun part! Since these were for my 4th of July tree I used my stash of patriotic papers and embellies to decorate both sides. Crepe paper ruffles, glass glitter, glitter paper, Stickles, punches and dies. On several of the ornaments I also added some paper border trim around the spool. 


I had some bits and pieces left over and put together this tiny garland ornament. Each pennant is only about an inch tall! 

Thanks for looking! As always, any questions post a comment! 
Posted by Picasa

Thursday, July 5, 2012

Happy 5th of July


 Happy 5th of July! 

I have not been here for over 2 months!!!! Life has just gotten in the way of my crafting and blogging. 
 I decided to re-arrange my craft room, move my sewing stuff to another room. It has taken me a lot longer than planned and still I am not finished. But I will save that for another post!

I did get my 4th of July tree up! I made a few new ornaments and also fixed one that did not survive the heat and sunlight of the solarium. I made a loopy chain garland from chenille stems in red, white and blue to circle the tree. I also made some little barrel ornaments I will share in another post. 


The ornament on the left started out with some patriotic crepe paper that disintegrated but the collage stayed intact. I added it to a vintage red Christmas light reflector. All shiny & new. 

I also finally scrapped my photos from my Newspaper article post about my 4th of July tree. 
I bought the photos from the Press Democrat and scrapped them on the lay out below. In my album I will have the layout on one side and the newspaper in a page protector next to it.


I used lots of red, white and blue of course! 

Thanks for looking!


Wednesday, April 25, 2012

A Little Scrapping and a Few Scrappy Cards


I have not posted any scrap pages in awhile, and since I just finished a few pages I thought I would post them along with a few of my other recent pages. I have a few cards at the end, 
made using my layout scraps. 


This first lay out is about our chickens. They have been busy this spring laying eggs, so we have cooked up lots of dishes to use them up. Creme Brulee, Tapioca Pudding, Lemon Meringue Pie, Quiche, Devilled Eggs, scrambled eggs, and fried eggs. Some of the girls really get cackling when they lay an egg! All pattern papers are Basic Grey.


This layout is about Father's Day, and my son's taking over the grilling duties for dad! A mix of pattern papers, mostly scraps! Crate Paper, Sassafras.


The next three layouts are made from an older paper line from SEI, Dill Blossom.
I love this paper line!
Both layouts are from my trip to Southern California with my sister Lou. The first layout is about the girls day out shopping with my sister and my niece Jennifer. We checked out some great decor stores that day.
And topped it off with a nice lunch in Laguna Beach.


I have been to many of the California Missions, but this trip was the first time to Mission Santa Barbara. In fact my first trip to actually stop in Santa Barbara. I had been through SB many times on the way north and south, but never had actually stopped to see the town or mission.


I had lots of photos of the mission and decided one, two page layout was not enough, so I also made another two pages to hold all the paper and journaling.
 
After I finished these two layouts, I took some of my scraps already on the table and
made these three cards.


The first was cut from a solid piece of the Dill blossom paper. I punched one edge of the card with a Fiskars punch.and added these fussy cut flowers, cut from more of the paper.  The "Hello" sentiment is from Stampin' Up.


The second card uses more fussy cut leaves from the Dill Blossom papers, and I stamped a Close to My Heart sentiment stamp and punched it out with a Stampin' Up label punch.


The last card uses more scraps from Dill Blossom, a border punch from Martha Stewart and a stamp from Autumn Leaves. I colored in the stamp image with color pencils and cut and framed the image with a  Spellbinders die.

Thanks for checking out my lastest craftyness!
Posted by Picasa

Saturday, April 7, 2012

Happy Easter

 Easter will be here the day after tomorrow! Have you planned your dinner menu if you are cooking? I haven't, but there is always Saturday! We are having ham, since I already bought one and a salad, as my sister is bringing that. I will decide on the rest later! 

Since Easter is almost here I thought I would post some more 
Easter decor before it is too late. 
Now that I am back to work full time, I leave the house by 6:30am and I am lucky if I am home by 5:30pm, so there is not as much crafting and blogging time as I would like! 

I did get my Easter tree up, but it is a little different this year. I did not use my "egg lights". Since I switched to LED lights, the egg lite covers do not fit as well over my light bulbs and I think when I pulled the eggs off last Easter, it broke the light set and I had to by a new set 
this last year at Christmas. 


Below are two ornaments I made. My little nest basket made from a Jello tin. 
And a little hen egg made with some vintage clip art.  


More vintage clip art made into an ornament.


My sister made me almost a dozen glittered eggs last Easter for my tree. 


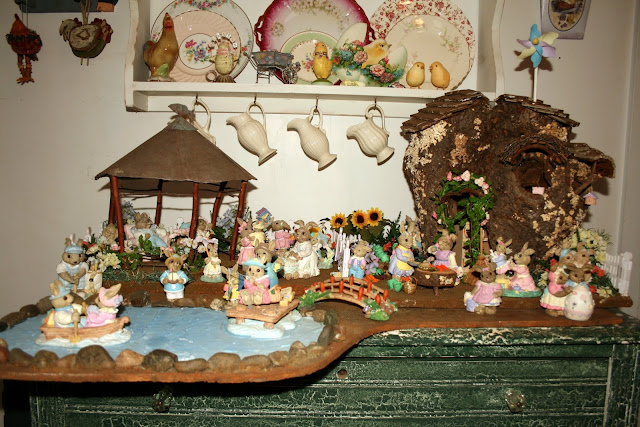
My next bit of Easter decor is my Bunny Village. I worked at Mervyn's many years and in the early '90's they sold these bunny figures below. I bought quite a few the short time they sold them from about 1991 to 1994? 

My bunnies needed a home, so I made them one from a hollow log. 


And you know how bunnies multiply, soon they out grew the log and the next year I added a gazebo, and the year after that a pond, since Mervyn's sold a set of fishing bunnies and a pair of bunnies in a boat. So I had to add some kind of water source!

There are mama bunnies, papa bunnies, baby bunnies, little boy and girl bunnies and 
young bunnies in love. 

 Grandma and Grandpa bunny have rockers and easy chairs to relax in under the gazebo, while they are watching the basket of baby bunnies. But both have decided to take a little nap! I hope the baby bunnies don't get into any mischief! 


All those bunnies need something to eat, so I planted a vegetable garden for them to harvest. Carrots, cabbages, beets and squash are on the menu! 


There are also beautiful flowers all around for the bunnies to enjoy.


And inside there are some canned goods in the cupboard to help feed the family. 


I hope everyone has a Happy Easter and enjoys gathering with their families, sharing Easter basket treats, (don't eat the chocolate bunny all at once!), successful egg hunts and a lovely day. 

Saturday, March 31, 2012

Easter Crafting


While browsing Pinterest I found a lovely burlap wreath that said it was the easiest burlap wreath to make. All it required was a roll of burlap and a 14 in wire wreath frame. And the decorations of your choice. I found what I needed at Michael's. I already had the eggs and found a nest at Beverly's.
It was very easy to create, just pull loops of burlap through the sections of the wire wreath frame, evenly spacing the loops and pulling and twisting the loops to get the look I wanted. 
I wired the nest to the wreath and just tucked sprigs of the blossoms in between the loops. 
Since nothing is glued to the burlap I can change the wreath decor with the seasons. 

You can find a photo pictorial at the link below.

My next Easter craft project were these little baskets or treat cups made from fancy cupcake papers. The ones I used came from the Martha Stewart line at Michael's.


I made these first two at a fundraising crop I went to hosted by my friend Heather
to raise money for her son's baseball league. It was a great crop and I would have made more that day, but I ran out of double stick tape!!

So this week I made a few more!


Below is the pile of supplies I used to make the baskets. The most important supply is a messy scrap table. Because no matter how often I pick up after myself I get crafty and make another mess!


This the tape I used. It comes in several different brands and widths. I used the 
1/8th inch size for my baskets.

Step one: cut about 1 inch off a standard piece of pipe cleaner or chenille stick. 
Cut a 1 inch wide piece of crepe paper twice the length of the pipe cleaner. 

 Using needle and thread make a running stitch down the middle of the crepe paper. Fold down the ends twice to make a sturdier support for the thread. 
When you have stitched the length of the paper, slowly gather the crepe paper until it is about an inch shorter at each end than the pipe cleaner. 


Place a strip of the super tacky tape along the center of the gathered strip of crepe paper, 
over the thread. Set aside. 


Using my Martha Stewart multi blade scissors I cut fringe into a strip of green crepe paper. 


I cut two strips of crepe paper to fit twice around the inside of the cup. I used more 
super tacky tape on the inside of the cake cup. 

I adhered the crepe paper around the inside and repeated this step to make a double row of fringe. 


The next step was to adhere the handle to the inside of the cup with more sticky tape. 


I used a paper punch to make a decorative paper strip from cardstock. This one has a hole pattern that I could weave ribbon through. 

Using a large needle I wove some seam binding ribbon through the holes. Paper is fragile, 
so I did this very carefully. I left about 5 inches of ribbon at both ends of the paper strip to tie a bow. 


More super sticky tape to adhere this strip to the basket between the paper cup and grass fringe. I centered the strip with center front of the basket.


I tied a bow with the ends of the ribbon. 


Next I added a flower to the basket handle and added a punched butterfly as an accent. I line of glitter glue (Stickles) down the center of the butterfly for a body. 

I used a layered paper flower with a brad here, but I also used a die cut flower and a 
vintage millinery flower on others. 


Add some Easter grass, Easter eggs, or better yet, chocolate eggs and you are all done!!


Filled with some chocolate or other goodies it will make a sweet Easter treat, 
or with pretty eggs, a bit of Easter decor.